
Zoom hacks for teaching translation and interpreting
If you’re teaching online, odds are you’re using Zoom. But are you using its full potential?
In this article, I’ll reveal my favorite Zoom hacks for teaching translation and interpreting online. From advanced sharing and annotation features to using your cell phone as a document camera, even experienced users will pick up a trick or two!
An introduction to Zoom
Founded in 2011, Zoom is a cloud-based platform for online video meetings, webinars and virtual events.
The company has navigated various privacy concerns – notably in early 2020 (remember “Zoombombing”?) and after introducing AI-powered features in August 2023. Now, its terms of service categorically state that “Zoom does not use any customer audio, video, chat, screen sharing, attachments, or other communications like customer content (such as poll results, whiteboard, and reactions) to train Zoom’s or its third-party artificial intelligence models.”
Zoom’s efforts paid off: Many universities offer licenses to their instructors and students. Even without a paid subscription, the free Basic plan covers a 40-minute meeting with up to 100 participants and includes nearly all the features covered in this article.
The challenges of teaching translation and interpreting on Zoom
Online teaching poses new challenges like bandwidth issues, ensuring students' cameras are on for effective communication, and coordinating activities.
But it also offers opportunities, with whiteboards, annotation, breakout rooms, and advanced sharing and recording features.
Read on for tips on how to leverage these features to turn translation and interpreting classes into dynamic online learning experiences.
Automatic captions
Zoom’s automatic captions in 30+ languages aren’t perfect. And as the company notes, they aren't a substitute for accessibility.
But they do open up unique teaching opportunities.
To turn on captions, choose “More,” “Captions,” “Show captions,” pick the language, and click “Save.”
If you switch languages mid-meeting, just change the “Caption Language.” Individual users can also switch the Caption language in breakout rooms.
Pro tip: the full transcript (accessed from the same menu) is searchable and could be an excellent starting point to discuss the pros and cons of working with automatic captions or kick off a conversation about accessibility. Why not try them for a sight translation exercise?

Spotlight and pin users
Zoom offers various video layouts. Speaker View displays a large image of the current speaker and a picture-in-picture thumbnail of the previous speaker, while Gallery View shows up to 25 participants per screen by default.
Use the Spotlight feature to display one or more speakers to all students (regardless of who is speaking). Hover over a participant's video, click the ellipsis icon, and pick “Spotlight for everyone.”
With Zoom, you can spotlight up to 9 participants – useful for viewing a speaker and sign language interpreter or comparing two interpreters’ body language.
A student can Pin up to 9 participants’ videos, which only affects their display. For example, in a classroom with multiple sign languages, they could pin the interpreter working into their language.
Advanced screen sharing features
You’ve probably already shared a window with your students using the Share Screen feature. But have you explored all the options under the Sharing tabs?
In the “Basic” tab, you can share a specific window. (I don’t recommend sharing your entire Desktop, which can be risky!)

Click the “Share sound” checkbox in the bottom corner to share sound from your computer.
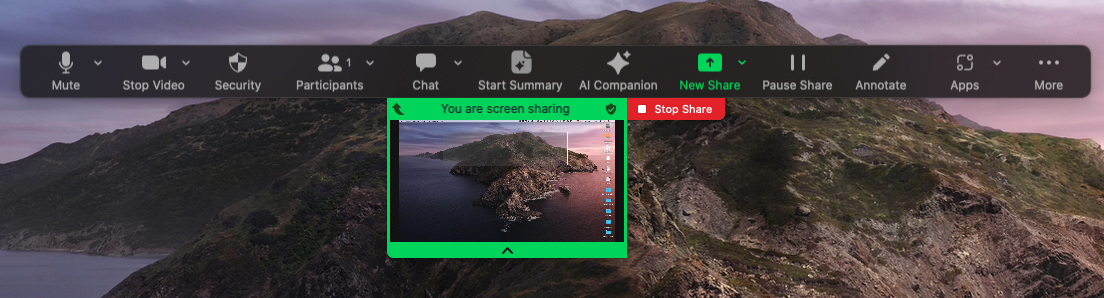
When you start screen sharing, you’ll see a green bar that says “You are screen sharing” and a red button to “Stop share.” Click the green dropdown arrow to see a thumbnail image of what you’re sharing – and check it regularly to avoid sharing the wrong window. 😉
The “Basic” sharing tab includes the “Whiteboard,” which is ideal for jotting down text or handwritten notes. Use the page controls button in the bottom right corner to add whiteboard pages or switch between them. The Whiteboard has multiple annotation features – more on this in a minute. When you close a whiteboard, each page is saved as a .png file you can share with students via email or a share link.
My favorite feature under the “Basic” tab is the option to share your iPhone or iPad screen. Although Zoom offers wireless sharing via Airplay, I prefer sharing “iPhone/iPad via Cable” to reduce lag. After sharing your tablet screen, you can diagram written sentences, work on note-taking symbols, demonstrate consecutive note-taking in real time, or annotate a student’s notes or a written translation. (Learn more in my article on How to use a tablet for consecutive note-taking or the chapter on using tablets for teaching interpreting in The Tablet Interpreting Manual.)
The “Basic” tab includes the nifty option to share multiple applications – hold the Shift key (MacOS) or Ctrl key (Windows) to select them. These applications must be on the same desktop and will be displayed as laid out on your screen. Why not use this to compare student translations, sets of notes, or to view notes alongside the original text?

The “Advanced” tab includes other useful options. Sharing a “Portion of screen” lets you draw a rectangle around the part you’d like to share; you can resize it while sharing by clicking and dragging. To avoid lag when sharing web-based videos, pick “Video” to share a clip from your computer using Zoom’s built-in video player. You can also share “Computer Audio,” which is great for consecutive practice (and a fun way to share music during a break).
My favorite “Advanced” tab option is sharing “Content from 2nd camera.” Connect a document camera to your computer (or use your phone as a webcam), position it above your notes, and students can observe note-taking in real-time – a perfect option if you don’t have a tablet.
At any point while sharing, you can click “Share Screen” again, choose a different screen, and then click “Share” to switch what students see.
Annotation
Zoom offers a full suite of tools to annotate a shared screen. (See this video for a walkthrough.) Pick “Text” to add typed annotations or “Draw” for lines, arrows, or shapes. Choose “Select” to resize and move annotations, “Erase” to remove parts of annotations, or “Clear” the entire screen.
My favorite options are under the “Spotlight” menu. “Spotlight” adds a halo around your mouse pointer to make it more visible. Annotate with the “Vanishing pen” and annotations disappear in seconds – perfect for quickly drawing students’ attention to part of the screen. Pick the “Arrow” to turn your cursor into a small arrow; click anywhere on the screen to insert an arrow with your name on it. Students can also use these features to point out parts of the text or notes they’d recommend improving.
Click the “More” button and “Disable Annotation for Others” if you don’t want your students to annotate.
Click “Save” to save your annotations in PNG or PDF format, then share them via the chat.

Advanced chat functions
Zoom chat lets you send messages to individual users or all participants. (If it’s a distraction, you can limit who participants can chat with or disable the chat.)
In 2023, Zoom rolled out an enhanced chat with numerous useful features:
Send messages with rich text formatting (like bold, underline, strikethrough, or bulleted or numbered lists).
Click the screenshot icon to snap a screenshot of part of your screen, annotate it, and send it via chat. (Ideal for individual student queries.)
React to messages with emojis.
Click the “reply” icon to create threaded replies.
Zoom also lets you send files through the chat box. Consider sending an audio file for students to interpret in pairs or a text for them to translate or sight translate.

Polls
Zoom polls let you break the ice or check students’ understanding and offer various question types and the option to collect answers anonymously.
One useful feature is creating breakout rooms from poll results. Use it to let students pick options – like splitting into groups by languages, topics, or preferences. Click “End poll” to close the poll, then “Create breakout rooms” to send them to rooms based on their choices. (You can also decide how many students you’d like in each room or move them around after creating rooms.)
Breakout rooms
Zoom’s Breakout Rooms are perfect for pair or group discussions or interpreting practice.
Click “Breakout Rooms” and select the number of rooms or participants per room. Create randomized student groups with the “Assign automatically” option, “Assign manually” to choose groups, or “Let participants choose room.” Then click “Create.”
You can rename your rooms (so students can pick based on language combinations or preferred topics) and change assignments by hovering over the student’s name and selecting “Move to” or “Exchange.”
Here are my favorite breakout room tips:
Pre-assign breakout rooms to save time, or “Save Breakout Rooms” to keep student groupings for future classes.
Set breakout rooms to close automatically after a specific amount of time by clicking “Options” (Windows) or the gear icon (Mac).
Use the “Broadcast” option to send messages with short instructions to breakout rooms, or “Broadcast Voice” for interpreting assignments. (Inform students in advance – a disembodied voice can be disconcerting!)
One little-known trick: Share your screen to breakout rooms. I use this to share slides with discussion questions, broadcast audio or video for interpreting practice (tick “Share Sound”), or include a countdown timer. (Just embed one from YouTube into Google Slides and broadcast your screen so students see the timer in real time.)
Recording
Zoom offers numerous recording options, making it easy to share class recordings, prepare materials, and send video feedback.
Here are my favorite ways to use this for teaching:
Record to the cloud, then share the link with students.
Record multiple snippets of a class using the “Pause” and “Stop Recording” options. After recording, change the viewing permissions to share with everyone via a link or with individual students via email.
Prepare class recordings or share feedback on a student’s work by hosting a Zoom meeting with yourself. Start the meeting, click “Record to the Cloud,” share your screen, and open a student’s text or video. Pause it to provide spoken or signed feedback, and annotate as needed.
Pro tip: To record high-quality video on Zoom, share your full screen at the beginning of a recording, then unshare it to “trick” Zoom into recording higher resolution video. (Otherwise, you’ll end up with 360p.)
What’s next for Zoom teaching?
Zoom’s AI companion is still in its infancy, and my initial testing has yielded inconsistent results. I look forward to exploring how its new features can complement translation and interpreting teaching, but for now...you’ve got plenty of tips to explore!